22 April 2026
I’ve decided on my next project. It will involve a bit of a web-development (front and back-end) and eventually a bit of AI integration.
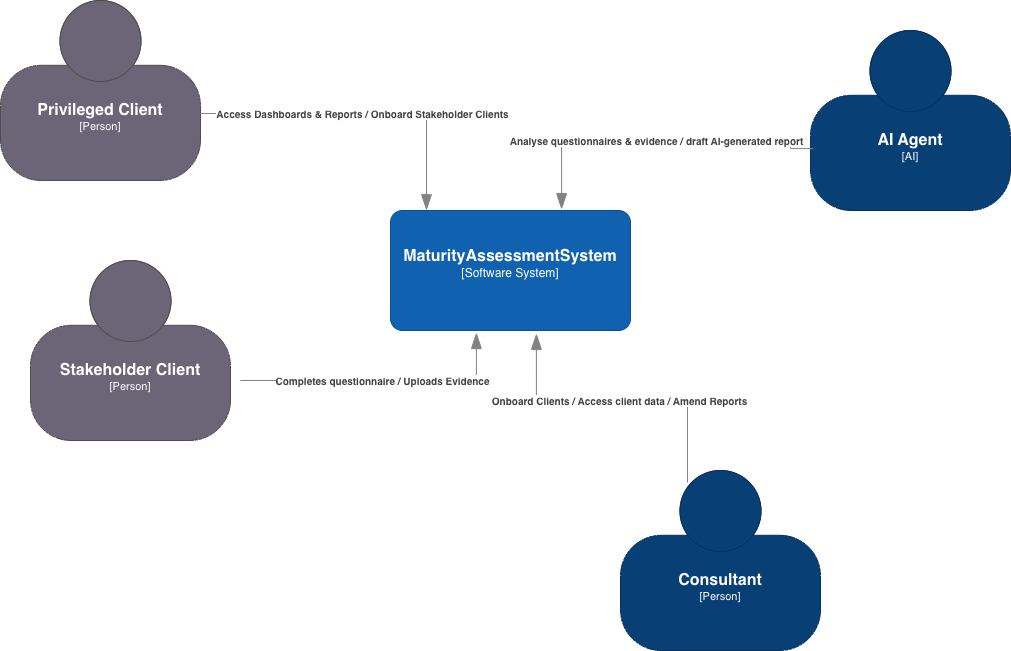
The goal is to develop a tool that enables organisations / consultancies to deliver cheap maturity assessments through a combination of a web application and backend AI models to provide maturity-assessment reports. This is intended as a loss-leader capability to allow small consultancies to get a foot hold within the organisation. They would provide an assessment against a framework of the client’s choice. Multiple stakeholders would then be encouraged to complete the assessment. The results could then be analysed and summarised through a mixture of consultancy support and AI.
So far, I’ve identified the following requirements:
- A front-end web application MUST be provided to allow Stakeholder Clients to complete the questionnaire and upload any supporting evidence too.
- A front-end web application MUST be provided to allow Privileged Clients to access maturity-assessment dashboards and any reports.
- Identity and access management MUST be provided to enable Stakeholder Clients and Privileged Clients to access the service - either to add data or to review dashboards and reports - limited to the data for their organisation.
- Identity and access management MUST be provided to enable Consultants to access all client data.
- The solution MUST be sufficiently configurable to add or alter maturity assessment questions.
- The solution MUST be capable of supporting multiple maturity assessment questionnaires (representing various IT / Governance Frameworks).
- An AI model SHOULD be used to take the findings (evidence submitted by the stakeholders) and provide a draft report.
- Consultants SHOULD be able to modify draft reports before promoting their state to permit the client to access them.sss
I’ve decided to use the C4 Mode to structure the design. The first step - the Context View - provide a the context of where the solution will sit and be used.
28 March 2026
The final addition to sneak is UDP support. Using UDP is very similar to TCP. The main differences are that with UDP, you don’t need to use the listen() and accept() methods. As a refresher, the following shows the fundamentals for TCP and UDP connections. The TCP example looks like this:
import socket

sock = socket.socket(socket.AF_INET, socket.SOCK_STREAM)
sock.bind(('', 1066))
sock.listen()
# Accepting a connection - needed for TCP
conn, addr = sock.accept()

while True:
    data = conn.recv(1024)
    print(data)
The same code for a UDP server is this:
import socket

sock = socket.socket(socket.AF_INET, socket.SOCK_DGRAM)
sock.bind(('', 1066))

while True:
    data, addr = sock.recvfrom(1024)
    print(data)
For sneak I’m using the low-level networking controls for asyncio, so the fundamentals are slightly different. I suggest looking at the code and the previous blog entries.
To accommodate UDP the following changes are made within accept_connection():
class SneakListener():
	...
	async def accept_connection(self):
	    if self.PROTO == 'udp':
	        self.loop = asyncio.get_running_loop()
	        with socket.socket(socket.AF_INET, socket.SOCK_DGRAM) as server:
	            server.bind((self.HOST, self.PORT))
	            server.setblocking(False)
	            while True:
	                data, addr = await self.loop.sock_recvfrom(server, 1024)
	                asyncio.create_task(self.handle_connection(server, addr, data=data))
	    else:
		    ...
And, the following are made within handle_connection():
class SneakListener():
	...
	async def handle_connection(self, con, addr, data=None):
	    if self.PROTO=='udp':
	        self.log_message(con, addr, data.strip())
	    else:
		    ...
The log_message() method has also been updated to include UDP and TCP within the messages so it is clear as to which protocol is being used to connect to the ports.
class SneakListener():
	...
    # Method to log messages
    def log_message(self, con, addr, msg):
        src_ip, src_port = addr
        dst_ip, dst_port = con.getsockname()
        log_msg = f"{self.PROTO.upper()} {src_ip} {src_port} {dst_ip} {dst_port} {msg}"
        logging.warning(log_msg)
And with that, this brings sneak to an end. When I originally started, I wanted to make a light-weight python app that could be used to listen to ports and detect attempted connections. I kind of saw this as a way of deploying lightweight sensors (at under 200 lines) to environments to be used to detect potential lateral movement attempts. This could be deployed onto low-cost hardware too, such as Raspberry Pi Zeros and plugged into the network. With a bit of syslog configuration, an enterprise could then ingest the logs into the SIEM. Low cost and simple to use!
25 March 2026
I’ve spent a bit of time analysing the collected logs using Jupyter Labs. Installing Jupyter is fairly simple to do into a Python venv. When run it opens up a browser to the Jupyter server. If you haven’t used Jupyter before, I suggest playing with it as it is GREAT!
$> python3 -m venv .jupyter
$> source .jupyter/bin/activate
(.jupyter)$> pip install jupyterlab
(.jupyter)$> jupyter lab
The log file, stored as aws_test.log for the purposes of this analysis, was copied across from the an AWS instance running sneak. The run configuration for sneak was:
$> sudo .sneak/bin/python3 sneak.py -t ':21,:22,:25,:80,:443,:135,:139,:445,:3389,:8080,:8443' -d
The chosen ports used are a result of a Google search to find the most common ports to be scanned over the Internet. Note, the SSH port was included. I had to move the SSH to another port on my AWS EC2 instance to free up port 22 for sneak. It is also worth noting (given the port ranges I want to listen to) that sneak had to be run as root.
The outcome of the test-run of sneak was very interesting. In a little over 2 days, it produced an 8.2MB log file - which I find amazing as sneak doesn’t do any kind of interaction beyond accepting and maintaining a TCP connection.
The total number of events recorded was: 60092.
with open('aws_test.log', 'r') as file:
    text = file.read()

text_list = text.split('\n')
print(f"Total number of events: {len(text_list)}")
To enable me to process the content, each line needed to be separated out into individual variables and consumed into a pandas.Dataframe(). Also, some of the variables needed to be converted to a relevant type. Port addresses where turned into integers and the timestamp was converted into a pandas datetime object (to allow me to perform date-time calculations). This code also uses the date-time records to show the time delta between the first recorded event and the last - 2 days 03:51:27.
import re
import pandas as pd

# Regex to break down each log-line into attributes for the DataFrame
pattern = re.compile(
    r"^(\d{4}-\d{2}-\d{2} \d{2}:\d{2}:\d{2}) - "  # timestamp
    r"(\d+\.\d+\.\d+\.\d+) "                      # source IP
    r"(\d+) "                                     # source port
    r"(\d+\.\d+\.\d+\.\d+) "                      # destination IP
    r"(\d+) "                                     # destination port
    r"(.+)$"                                      # message
)

text_processed = []
for i in text_list:
    matched = pattern.match(i)
    if matched:
        text_processed.append(matched.groups())

df = pd.DataFrame(text_processed, columns =['timestamp', 'src_ip',
                                            'src_port', 'dst_ip',
                                            'dst_port', 'message'])

# Defining the data types of the DataFrame columns
df = df.astype({
    "timestamp": "string",
    "src_ip": "string",
    "src_port": "int",
    "dst_ip": "string",
    "dst_port": "int",
    "message": "string"
})
df['timestamp'] = pd.to_datetime(df['timestamp'])

# Calculating time-stamp delta between the last and first entries
duration = df['timestamp'].iloc[-1] - df['timestamp'].iloc[0]
print(f"The total time the sneak test-run was performed for was: {duration}")
When looking at the destination ports - by far the most targeted port was 445 (SMB) - which I wasn’t expecting. Of the 60092 events, 56148 were on port 445.
# Some basic stats on the different connections
port_distribution = df['dst_port'].value_counts()

for i in port_distribution.index:
    print(f"Port {i} received {port_distribution[i]} events")
Here is the breakdown of the event distribution across the listening ports.
Port 445 received 56148 events
Port 80 received 1341 events
Port 443 received 1269 events
Port 3389 received 288 events
Port 21 received 279 events
Port 8443 received 222 events
Port 8080 received 211 events
Port 22 received 158 events
Port 25 received 74 events
Port 135 received 73 events
Port 139 received 28 events
When looking through the log files, I also noticed some interesting User-Agent headers being sent to ports 80 and 443 (HTTP and HTTPS). To help analyse these headers, the first step was to create a new DataFrame just containing events from those 2 ports, followed by extracting the User-Agent content with the help of a DataFrame regex.
There were 34 distinct User-Agent headers captured. Most where as expected, but there were some interesting ones from security companies doing scanning. These were:
- Nokia (GenomeCrawler);
- Palo Alto (Cortex Scanning);
- Internet Measurement;
- Censys Inspect; and
- A lonely instance of ‘Hello, World’.
# Getting some HTTP and HTTPS stats
df_http = df[(df['dst_port']==80) | (df['dst_port']==443)]
distinct_user_agents = df_http['message'].str.extract(r"User-Agent:\s*(.*?)\\r\\n")[0].value_counts()
distinct_user_agents.index.name = "User-Agents"

print(f"The number of distinct User-Agents used for connecting to ports 80 & 443 are: {len(distinct_user_agents.index)}\n\n")
print(f"The User-Agents are...\n")
for i in distinct_user_agents.index:
    print(i)
I then looked at SMB (as that is where most of the traffic was aimed). Of a total of 56148 events going to port 445, 55065 of them were coming from a single IP address: 45.43.55.119. I did a Geolookup of that IP address and it appears to be coming from Tapei. I really don’t know what they were trying to do as sneak doesn’t engage beyond maintaining a TCP connection.
# SMB analysis
df_smb = df[df['dst_port']==445]
df_smb['src_ip'].value_counts()

print(f"By far the largest number of events were to port 445 - a total of {len(df_smb)}")
print(f"The vast majority was from a single IP address: {df_smb['src_ip'].value_counts().index[0]}\n")
print("Here is the value count by SRC IP")
print(df_smb['src_ip'].value_counts())
Just to show how ridiculous the traffic was to port 445, here is a an extract of the printed distribution.
src_ip
45.43.55.119       55065
154.134.185.110      857
61.153.205.10         24
16.58.56.214          21
66.132.224.79         20
159.65.219.252        18
3.131.220.121         12
20.169.104.239         9
74.235.162.254         9
64.227.110.161         9
103.124.153.190        6
In conclusion, I think sneak is working very well. Despite the high traffic going to the ports, the CPU processing on my minimal EC2 instance barely got above 3%. The next step is to add UDP support.
22 March 2026
Based on a bit of trial and error, I’ve settled on a config file format (in JSON) that looks like the following:
{
  "tcp": {
    "localhost": [8080, 8443],
    "": [1066]
  },
  "udp": {
    "localhost": [53]
  }
}
It is split hierarchically based on whether the ports are TCP or UDP. After that, they are then split based on the host IP, followed by a list of ports to listen to. An empty host means that the port is accessible from all host endpoints on the device. Its structure is such that it should be fairly easy to add or remove ports with minimal changes to the file.
NOTE: UDP processing hasn’t been created yet. If you playing with sneak, avoid using --udp and the JSON ‘udp’ option for now.
I’m using the json module to ingest the JSON as a dictionary. If the --file option is used, the following code in sneak is used to extract the desired protocols, hosts and ports and submit it to the process_ports() method. This returns the results in a form that can then be used with SneakListener(host, port, protocol). The code that handles the JSON configuration file looks like this:
import json
...

async def main():
...

if args.file: # Ingest json file and add to targets
    with open(args.file, 'r') as file:
        config = json.load(file)
    for proto in config.keys():
        for host_ports in config[proto].items():
            host = host_ports[0]
            for port in host_ports[1]:
                targets.extend(process_ports(f"{host}:{port}",  proto))
It is worth noting that the JSON file is processed in addition to the --tcp and --udp options. So, any combination can be used to add ports for sneak to enable and start listening to.
In addition to this, I’ve also spun up and AWS EC2 instance and I’ve set sneak running using the following command-line options:
$> sudo .sneak/bin/python3 sneak.py -t ':21,:22,:25,:80,:443,:135,:139,:445,:3389,:8080,:8443' -d
It is running in --daemon mode so I don’t need to keep my SSH session alive, and the events are being written to the default log file: out.log. I’m curious to see what the results will be. For my next entry, I’ll try to do a bit of analysis of the log file, using Python.
21 March 2026
I’ve added a command-line interface to sneak, using the argparse module. It simplifies the creation of command line arguments and it also addresses the command-line tool help request.
The command line options I’ve added are used for the following:
- Adding TCP and UDP ports to
SneakListener(), via--tcpand--udp. - Importing TCP and UDP ports from a configuration file (maybe written in JSON syntax), via
---file. I will work on this later. - The ability to daemonise the process such that it runs in the background (not tied to the terminal), via
--daemon. - The selection of a log-file to output to, using
--logfile. This includes additional logic based on whether the process is daemonised or not. If it is running in a daemon mode, it automatically logs toout.log, unless a log-file name is specified. If running in the terminal, the log-file option will write it both to the file and to stdout.
The following snippet shows the creation of the argparse arguments.
import argparse
...

# Defining argparse arguments
parser = argparse.ArgumentParser()
parser.add_argument("-d", "--daemon", help="Detach and run a daemon process. Default log file is output.log", action="store_true")
parser.add_argument("-t", "--tcp", help="List of TCP ports to listen on.")
parser.add_argument("-u", "--udp", help="List of UDP ports to listen on.")
parser.add_argument("-f", "--file", help="Configuration file that contains TCP and UDP ports to listen on.")
parser.add_argument("-l", "--logfile", help="Log file to capture events.")
The --daemon option isn’t used yet to detach the process from the terminal. This will be added later. For now I’d like to get the core functionality working for the rest of the options.
To handle the TCP and UDP requests, I’ve added a separate method that takes in the arguments in a string form, and outputs a list of tuples that includes the: (HOST, PORT, PROTOCOL).
# Extract the host and port to be listened to
def process_ports(string_in, proto):
    split_string = string_in.split(',')

    port_targets = []
    for i in split_string:
        host, port = i.split(':')
        port_targets.append((proto, host, int(port)))

async def main():
	args = parser.parse_args()
	...

	# Extract the ports to be listened on
	targets = []
	if args.tcp:
	    targets.extend(process_ports(args.tcp, 'tcp'))
	elif args.udp:
	    targets.extend(process_ports(args.tcp, 'udp'))
	else:
	    exit("No ports configured")
	...

	# Per target, instantiate SneakListener and start it
	for protocol, host, port in targets:
	    SneakListener(host, port, protocol).start()
Both the UDP and TCP ports are added to a single targets list. This is then iterated over later to create individual SneakListener() threads. Currently, UDP ports aren’t handled by SneakListener(). Something else for the to-do list.
The following code addresses the ‘writing to a log file’ dependencies between the --daemon and the --logfile options. If I want to daemonise the service, then I want it to by default write to out.log, unless I choose the file using --logfile. If running in the terminal (so I see the output in stdout), if I choose --logfile, I want it to write to both stdout and the log file.
asynch def main():
...

#Logging configuration
if args.daemon:
    logfile = "out.log"
    if args.logfile:
        logfile=args.logfile
    logging_args = {'level':logging.INFO, 'format':"{asctime} - {message}",
                        'style':"{", 'datefmt':"%Y-%m-%d %H:%M:%S", 'filename':logfile}
else:
    if args.logfile:
        logging_args = {'level':logging.INFO, 'format':"{asctime} - {message}",
                        'style':"{", 'datefmt':"%Y-%m-%d %H:%M:%S",
                        'handlers': [logging.FileHandler(args.logfile), logging.StreamHandler()]}
    else:
        logging_args = {'level':logging.INFO, 'format':"{asctime} - {message}",
                        'style':"{", 'datefmt':"%Y-%m-%d %H:%M:%S"}
logging.basicConfig(**logging_args)
12 March 2026
I want to avoid using print statements as it looks messy as each socket is being run asynchronously in their own threads and therefore compete for stdout. Also, it would be good to have a method of eventually dumping the output to a log file that could be ingested into a SIEM or some other kind of analytics tool.
The best solution for python is the logging module. It is fairly easy to use. When the app firsts runs, logging is initialised (configured) using logging.basicConfig(). Afterwards, you can send a message out using logging using one of the following:
logging.info()logging.debug()logging.warning()logging.error()logging.critical()
The message level isn’t really important for what I’m trying to achieve, so logging.warning() is fine.
To following is used to define what the messages look like the following.
import logger
logging.basicConfig(level=logging.INFO, format="{asctime} - {message}", style="{", datefmt="%Y-%m-%d %H:%M:%S")
It is worth noting that once logging basicConfig() is run, if run again, it won’t change any of its attributes - which is very annoying when experimenting in the REPL.
The main purpose for me running logging.basicConfig() is to define the structure of the logged messages. The timestamp structure is chosen to be ISO8601 compliant. The timestamp is separated from the message using a hyphen. The formatting looks like this.
<timestamp> - <src_ip> <src_port> <dst_ip> <dst_port> <message>
Within SneakListener(), I’ve added another method, log_message(), which takes the socket object and the address tuple, along with a message. It then calls logger.warning(), to print out the event.
# Method to log messages
def log_message(self, con, addr, msg):
    src_ip, src_port = addr
    dst_ip, dst_port = con.getsockname()
    log_msg = f"{src_ip} {src_port} {dst_ip} {dst_port} {msg}"
    logging.warning(log_msg)
The different kinds of messages sneak outputs are: an accepted connection; a closed connection; a reset connection; and any data (bytes) sent by the connected client.
11 March 2026
Re-visiting sneak, I’ve re-written it using asyncio for the connections and threading for each listening port. It seems to work reasonably well. Code is below and I’m also uploading this to GitHub - please refer to sneak.
With three listening ports up and running, it is only consuming about 20% of a CPU, which I’m happy with.
import socket
import threading
import asyncio

# Class to handle connections
class SneakListener():
    def __init__(self, HOST, PORT):
        self.HOST = HOST
        self.PORT = PORT

    # Coroutine that handles the established connection
    async def handle_connection(self, con, addr):
        print(f"[CONNECTION] {addr}")
        with con:
            try:
                while True:
                    data = await self.loop.sock_recv(con,1024)
                    if not data:
                        # Executed if FIN packet received.
                        print(f"[DISCONNECTED] {addr}")
                        break
                    message = data.decode()
                    print(f"[{addr}] {message.strip()}")
                    con.sendall(f"Echo: {message}".encode())
            except ConnectionResetError:
                # Executed if RST packet received.
                print(f"[CONNECTION RESET] {addr}")

    # Coroutine that accepts connections
    async def accept_connection(self):
        self.loop = asyncio.get_running_loop()
        with socket.socket(socket.AF_INET, socket.SOCK_STREAM) as server:
            server.bind((self.HOST, self.PORT))
            server.setblocking(False)
            server.listen()
            print(f"[LISTENING] Server listening on {self.HOST}:{self.PORT}")
            while True:
                conn, addr = await self.loop.sock_accept(server)
                asyncio.create_task(self.handle_connection(conn, addr))

    # Thread starts the asyncio event handler.
    def run_thread(self):
        asyncio.run(self.accept_connection())

    # Start the listener by spinning up a listener thread
    def start(self):
        thread = threading.Thread(
            target=self.run_thread,
            daemon=True
        )
        thread.start()

async def main():
    targets = [('', 1066), ('localhost', 1067), ('localhost', 1068)]

    # creating a future that is never set - a way to stop the app from exiting
    loop = asyncio.get_running_loop()
    never_arriving_future = loop.create_future()

    # Per target, instantiate SneakListener and start it
    for host, port in targets:
        SneakListener(host, port).start()

    # Putting main to sleep indefinitely
    await never_arriving_future

if __name__ == "__main__":
    asyncio.run(main())
The coroutine main() is used to instantiate all of the requested listening sockets. It does this by instantiating the class, SneakListener() and triggering each instance’s start() method, which starts a thread (per listening socket). As we are relying on threads to operate the listening sockets, the main() coroutine cannot end, otherwise the program exits before anything really happens.
To stop it from exiting early, I spent a bit of time umming and ahhing over how to do this. Initially I had a while loop with an asynchio.sleep(0) to pause main() for short periods. This seemed a bit over kill just to sleep main() and stop the processor from being thrashed. In the end I settled on a future that never gets set. I create one using loop.create_future() and then at the back of main(), I await it. As the future is never set, the await is never fulfilled - so main() is kept asleep.
Within SneakListener, there are two coroutines for managing connections. The first, accept_connection(), sets up a listening socket and then uses asynio to accept any connection. The accepted connection is then handed to the second coroutine handle_connection(). This coroutine is responsible for maintaining the connection and interacting with the client communicating with it.
The functionality is so far fairly noddy. The coroutines are writing to the terminal, which is looking messy as they are being handled asynchronously. To tidy up the event reporting, I’m going to be capturing some proper logs using the logging module.
Also, I’m going to use argarse to add some command-line options to sneak.
27 Feb 2026
For this entry I’ve done the following. I’ve spent a bit of time exploring of the nature of awaiting coroutines and tasks. I also briefly touch on the use of futures to coordinate activities between coroutines. Finally, I tackle the challenge of using the socket module asynchronously with what is provided by asyncio.
It is worth highlighting that asyncio already provides a solution for the handling of asynchronous sockets, that I’ll be using when I get back into working on sneak. In the interest of learning I’ve tried to avoid doing it the ‘right’ way; instead I’ve used all that I’ve learned so far about asyncio to write code to use the socket module asynchronously.
Exploring the Blocking Nature of ‘await’
I’ve covered await before, but I thought it would be worth reiterating its basic workings to understand its use in ‘blocking’ coroutines. The await expression is a blocking expression that blocks the parent coroutine that calls it - even if the awaited expression is await asyncio.create_task(coroutine()). This adds an additional dimension to writing asynchronous code that has been causing me a headache. You need to ensure that the coroutine that is calling await can be blocked until the awaited tasks or coroutines have completed (and not expecting code beneath the await statement to run as the task is being handled by the event loop).
The following code shows the blocking nature of await. Within main(), the string << Finish main isn’t printed until the two gathered tasks are completed. main() Is effectively blocked until all the tasks finish.
import asyncio

async def coroutine(delay):
    print(f"Begin delay of: {delay}")
    await asyncio.sleep(delay)
    print(f"End delay of: {delay}")


async def main():
    print(">> Starting main")
    await asyncio.gather(coroutine(2), coroutine(3))
    print("<< Finish main")

asyncio.run(main())
Here is the output:
>> Starting main
Begin delay of: 2
Begin delay of: 3
End delay of: 2
End delay of: 3
<< Finish main
With asyncio.create_task(...) it is possible of to run tasks without awaiting the parent coroutine function (without putting await in front of it). This means that main() isn’t blocked. You can see this happen when you run the following code. When run, all the main() print statements are executed before the asyncio.create_task() created tasks finish. Note that I’m using the additional asyncio.sleep() statement to keep the code running, otherwise the application quits before the asynchronous tasks have completed (because main() isn’t being blocked).
import asyncio

async def coroutine(delay):
    print(f"Begin delay of: {delay}")
    await asyncio.sleep(delay)
    print(f"End delay of: {delay}")

async def main():
    print(">> Starting main")
    asyncio.create_task(coroutine(2))
    asyncio.create_task(coroutine(3))
    print("<< Finish main")

    await asyncio.sleep(4)

asyncio.run(main())
Here is the output - note the order change in the printed output.
>> Starting main
<< Finish main
Begin delay of: 2
Begin delay of: 3
End delay of: 2
End delay of: 3
Exploring the Use of Futures
In asyncio, a future is an object that represents a result that will be available later. It’s essentially a placeholder for a value that hasn’t been computed yet.
By using futures, it is possible to coordinate activities between asynchronous tasks. The following code shows this. Coroutine first() prints a string and then awaits for the future to be completed. Coroutine second() is responsible for setting the futures values once it has completed its own asynchronous tasks. Once the future is set, the awaited coroutine, first(), comes back to life and finishes.
import asyncio

async def left(future):
    print("left: waiting for right to finish")
    # await for the shared future to be set / enter into a finished state
    await future
    print("left: finishing now that right has finished")

async def right(future):
    print("right: doing an asynchronous job")
    await asyncio.sleep(2)
    print("right: finished asynchronous job")
    # setting the shared future so that coroutine task 'left' can run
    future.set_result(True)

async def main():
    # Creating a shared future to coordinate execution between left and right.
    loop = asyncio.get_running_loop()
    future = loop.create_future()

    await asyncio.gather(left(future), right(future))

asyncio.run(main())
See the output:
left: waiting for right to finish
right: doing an asynchronous job
right: finished asynchronous job
left: finishing now that right has finished
Making Synchronous Sockets, Asynchronous
The code below is my own bad attempt to use asynchronous programming with the socket module.
There are two coroutine functions. One, accept_connection(), is for checking for whether there are any connection requests on the bound host and port. The other, receive_data() checks then for when there is any data on those accepted connections.
There is a global list, buffer, which is the only signal between the two. accept_connection() Adds new connected socket objects to buffer. receive_data(), iterates through buffer to check for any available data and to clear out closed socket objects.
The two are run asynchronously through a little trick I discovered. Whenever you want to hand synchronous code by the event handler, use await asyncio.sleep(0). It doesn’t actually sleep the code, but instead it is paused by the event handler, to allow the next coroutine task to run.
import asyncio
import socket

PORT = 1066
HOST = 'localhost'

# Instantiate the socket and start listening.
sock = socket.socket(socket.AF_INET, socket.SOCK_STREAM)
sock.bind((HOST, PORT))
sock.setblocking(False)
sock.listen()
# Global buffer for holding all connection objects
buffer = []

# Method accept_connection constantly checks for connection requests.
# Awaiting asyncio.sleep(0) is used to pass control back to the event loop after each check.
async def accept_connection():
    global buffer, sock
    while True:
        try:
            conn, addr = sock.accept()
            print(f"connected to {addr}")
            buffer.append(conn)
        except BlockingIOError:
            pass
        await asyncio.sleep(0)

# Method receive_data cycles through the connection buffer and checks for available data.
# asyncio.sleep(0) is used to pass control back to the event loop after cycling through the buffer
async def receive_data():
    global buffer
    while True:
        # iterate through a buffer copy 'buffer[:] and use enumerate to access the index too'
        for index, conn in enumerate(buffer[:]):
            try:
                data = conn.recv(1024)
                if not data:
                    # remove the connection object once it is closed.
                    buffer.pop(index)
                    continue
                print(data)
            except BlockingIOError:
                pass
            except ConnectionResetError:
                pass
        # pass back to the event handler.
        await asyncio.sleep(0)

async def main():
    # Run the two coroutine tasks. The only linking variable is the global buffer for holding
    # connection (socket) objects    await asyncio.gather(accept_connection(), receive_data())

asyncio.run(main())
Reflecting back on it, the code looks awful. This could most probably be improved by using asyncio for loops. Also, I was hoping to maybe use futures in the code too - but I couldn’t figure out how to get that working in time. Unfortunately, as I’ve had enough of asyncio, I will be going back to developing sneak.
13 Feb 2026
The Basics
I’ve spent a bit of time getting to grips with the asyncio module - which is not an easy thing to grasp. Its primary purpose is to permit for concurrent programming (similar to what threading provides), but within a single thread. Using asyncio should technically be more efficient than using threading given the context-swapping overhead associated with threads.
asyncio Works concurrently through its own event loop, which is able to pause asynchronous functions and then come back to them when they require handling. The underlying mechanisms I believe is built upon Python generators; i.e. asynchronous functions yield to the event loop.
When learning to develop using asyncio, there are two Python expressions that need to be understood: async and await.
async Defines a coroutine (a function that is to be handled via the event loop), and it is something that is added at the beginning of every function’s definition.
import asyncio

# Defining a coroutine
async def test_coroutine():
	print("this is a test")

asyncio.run(test_coroutine())
To run the coroutine, in the above example, I am using asyncio.run(). This on its own doesn’t make for a single-threaded concurrent program, as all the run command is doing is initialising the event loop and then executing the referenced coroutine.
If you try to run the coroutine without asyncio.run(), all it does is return a coroutine object. To run it, it needs to be handled by asyncio, hence the run command.
Although asyncio.run() runs the coroutine function passed to it, if the coroutine then wishes to run any other coroutines itself, then you need to use the await expression. If you don’t, a coroutine object is returned and Python complains.
The following shows the use of await to run the coroutines:
import asyncio

async def test_coroutine1():
	print("test coroutine1")

async def test_coroutine2():
	print("test coroutine2")

def test_routine():
	print("test routine")

# If coroutines aren't awaited, then a RuntimeWarning exception is thrown
# This is a common pattern in asyncio programming - using main as the top-level
# coroutine.
async def main():
	# await coroutines
	await test_coroutine1()
	await test_coroutine2()

	# call normal functions in the usual way
	test_routine()

asyncio.run(main())
Concurrent Programming
What is written above isn’t concurrent. The example code doesn’t demonstrate any asynchronous behaviour and therefore will execute in order (synchronously).
When the event loop is up and running, when await expressions are encountered in the code, if the coroutine that proceeds the await expression, isn’t ready, the purpose of await is to pause the encapsulating function until it is ready to respond. In the above example, that would mean main() is paused until the blocking coroutine (such as test_coroutine1()) is handled.
It is common to demonstrate these principles with await asyncio.sleep(), which introduces asynchronous behaviour to coroutines. The following example demonstrates the sleep function.
import asyncio

async def test_coroutine(delay):
    print(f"Test coroutine - sleep for {delay}")
    await asyncio.sleep(2)
    print(f"Sleep for {delay}, finished")
    return 0

async def main():
    await test_coroutine(1)
    await test_coroutine(3)
    await test_coroutine(5)

asyncio.run(main())
Again, this isn’t demonstrating concurrent execution. Each call of test_coroutine() waits for the previous one to complete. This is the terminal output.
Test coroutine - sleep for 1
Sleep for 1, finished
Test coroutine - sleep for 3
Sleep for 3, finished
Test coroutine - sleep for 5
Sleep for 5, finished
To get the event loop properly working, you need to convert the coroutines into tasks. This adds a task wrapper, which means it can be handled by the event loop asynchronously. This requires a small change to the above code, to create tasks.
If you recall, calling a coroutine without an await returns a coroutine object. The asyncio.create_task() method then provides a task wrapper to the coroutine object, which then can be scheduled and handled by the event loop.
import asyncio

async def test_coroutine(delay):
    print(f"Test coroutine - sleep for {delay}")
    await asyncio.sleep(2)
    print(f"Sleep for {delay}, finished")
    return 0

async def main():
    task1 = asyncio.create_task(test_coroutine(1))
    task2 = asyncio.create_task(test_coroutine(3))
    task3 = asyncio.create_task(test_coroutine(5))

    await task1
    await task2
    await task3

asyncio.run(main())
By using tasks instead, the terminal output below shows the coroutines are now being run asynchronously.
Test coroutine - sleep for 1
Test coroutine - sleep for 3
Test coroutine - sleep for 5
Sleep for 1, finished
Sleep for 3, finished
Sleep for 5, finished
Instead of creating a series of tasks and then ‘awaiting’ each of them, the preferred method is to use await asyncio.gather() . Tasks and coroutines can be called using this method and it will automatically apply the task wrapper to the objects and hand them over to the event loop.
import asyncio

async def test_coroutine(delay):
    print(f"Test coroutine - sleep for {delay}")
    await asyncio.sleep(2)
    print(f"Sleep for {delay}, finished")

async def main():
    await asyncio.gather(test_coroutine(1), test_coroutine(3), test_coroutine(5))

asyncio.run(main())
Adding Async Functionality to a Sync code
asyncio Can be used to handle synchronous functions asynchronously. The following demonstrates how this is done using run_in_executor(). The way asyncio handles synchronous functions is to hand them off to either a thread or process pool, to prevent them from blocking the rest of the code. The downside is that this approach adds on the thread / process handling overhead.
import asyncio
import time

def synchronous_code(delay=2):
    print(f"Doing a synchronous delay of {delay} seconds")
    time.sleep(delay)
    print(f"Finished waiting for {delay} seconds")


async def main():
    loop = asyncio.get_running_loop()

    loop.run_in_executor(None, synchronous_code, 1)
    loop.run_in_executor(None, synchronous_code, 3)
    loop.run_in_executor(None, synchronous_code, 5)

asyncio.run(main())
Here is a more practical example using actual asynchronous events - connecting to and requesting web-page content.
import asyncio
import requests

def async_get(URL):
    print(f"Requesting {URL}")
    req = requests.get(URL).text
    print(f"Finished {URL} - size is {len(req)}")

async def main():
    loop = asyncio.get_running_loop()

    req1 = loop.run_in_executor(None, async_get, "http://example.com")
    req2 = loop.run_in_executor(None, async_get, "https://google.com")
    req3 = loop.run_in_executor(None, async_get, "https://bbc.co.uk")

asyncio.run(main())
The output shows the requests are being dealt with asynchronously (using threads):
Requesting http://example.com
Requesting https://google.com
Requesting https://bbc.co.uk
Finished http://example.com - size is 528
Finished https://bbc.co.uk - size is 879322
Finished https://google.com - size is 17401
Although this is exploiting asyncio to introduce asynchronous behaviour, it is still cheating as the synchronous functions are being hived off into threads. It isn’t truly single threaded.
Next, I’m going to explore how asynchronous tasks are created at a low-level, so I can grasp the mechanisms that make them work.
3 Feb 2026
The selectors module in Python provides a high-level, efficient way to do I/O multiplexing - that is, waiting for and responding to I/O readiness (read/write) on multiple file objects at the same time.
It’s mainly used for event-driven networking and under the hood chooses the best available OS mechanism (like epoll, kqueue, poll, or select) for your platform. It’s main use case is for socket management in Python.
The following code demonstrates the fundamental principles for selectors with sockets.
import selectors, socket

# Instanstiate a selector
sel = selectors.DefaultSelector()

# Create a basic socket
with socket.socket(socket.AF_INET, socket.SOCK_STREAM) as sock:
    sock.bind(('', 1066))
    sock.listen()
    sock.setblocking(False)
    sel.register(sock, selectors.EVENT_READ, data=None)

# Pause (block) until Read or Write is ready to pull from or send to socket object.
sel.select()
Start by first create a selectors object (using DefaultSelector) to choose the systems defaulting polling / interrupt approach. A socket is then instantiated and set to non-blocking. The socket object is then registered with the selector (i.e., it is to be handled via the selector). Finally, selectors.select() is called and blocks, waiting for an interrupt to respond to a new connection request (or data read request, when servicing sockets).
The immediate benefit of using selectors, versus writing your own event loop is the performance. The python app is consuming negligible CPU resource whilst waiting for the selector to return, compared to my previous ham-fisted approach.
When registering a fileobj with a selector, there is a data field that needs to be set. The sample code within Python Docs demonstrates how this can be used to great effect. In this sample, it is used to hold function pointers. When sel.selector() returns, custom code can then trawl through the registered objects that need servicing and then use the held function pointers to call the relevant handler functions.
The following code is an example of how new connections and data read requests can be handled in this way. Multiple connections to port 1066 can be made and used with next to no CPU performance impact.
import selectors, socket

# Instanstiate a selector
sel = selectors.DefaultSelector()

# Handler for new connection requests
def connect(socObj, mask):
    conn, addr = socObj.accept()
    conn.setblocking(False)

    # Register the new connection with the data-receive handler
    sel.register(conn, selectors.EVENT_READ, receive)

# Handler for when data is ready to be received def receive(socObj, mask):
    data = socObj.recv(1024)
    if data:
        print(data)
    else:
        # Unregister if data was empty (connection closed)
        sel.unregister(socObj)

def main():

    # Create and bind the socket
    with socket.socket(socket.AF_INET, socket.SOCK_STREAM) as sock:
        sock.bind(('localhost', 1066))
        sock.listen()
        sock.setblocking(False)

        # Register socket with selector and point to the connection handler function
        sel.register(sock, selectors.EVENT_READ, data=connect)

        # Event loop using select to handle new connections and data read requests.
        while True:
            # If there are any queued events, return and handle them.
            events = sel.select()
            for key, mask in events:
                # Calling the handler
                key.data(key.fileobj, mask)

if __name__ == '__main__':
    main()
30 Jan 2026
In all my years of paying around with Python, whenever dealing with sockets, I’ve always just copied and pasted samples from the Internet, and then tweaked it a bit so it met my needs. I’ve always found Python socket programming a bit too involved.
This time I’ve decided to put in the effort to understand it. Part of that understanding will also be about understanding the various concurrency models that can be used with it. But for now, I’ll stick with playing with the socket module.
The sample code below demonstrates the most fundamental part of using socket. You first instantiate a socket and then bind it to a host and port - in this case ‘localhost’ and port 1066. After which you initialise it to listen for incoming connections.
The next two steps are: 1) accepting the connection; and 2) receiving the data from the client. Both default to blocking whilst waiting for something to happen. If you run the code, it will first stop at s.accept(); once a connection is made, it will stop at con.recv() (where con is the socket object created by a connection).
import time
def main():
    start = time.time()

    # Initialise the socket and listen for a connection
    s = socket.socket(socket.AF_INET, socket.SOCK_STREAM)
    s.bind((HOST, PORT))
    s.listen()

    # Accept a connection - socket.accept() is blocking
    con, addr = s.accept()
    print(f"time to accept: {time.time()-start}")

    # Receive the data - socket.recv() is blocking
    data = con.recv()
    print(f"time to receive: {time.time()-start}")

    s.close()
This code is pretty useless. It assumes that only one client will ever connect. Therefore there needs to be some kind of Event Loop to check for new connections and then service them.
To avoid the blocking of accept and recv, you need to set socket.setblocking(False), but then the code very quickly throws a BlockingIOError.
To get concurrency and handle these exceptions, the recommendation is to use either threads, asyncio or selectors.
Just for a bit of fun, I decided to do it myself - see the code below.
Class MySocketClass acts as a container (with methods for new connections). As a part of __init__, I pass it the host and port and it then instantiates a socket. This allows me to create multiple sockets (for various ports) that are self contained within various instances of MySocketClass.
There are two methods: one to check for new connections (checkForNewConnection) and the other to check for available data (checkForData). For accept and recv calls, I’ve used try/except to ignore the BlockingIOError exceptions.
I’ve created a queue - which is just a list - to hold all new connections that are then checked and serviced by checkForData.
Finally, within main, is my event loop, which is an infinite while loop, which keeps running checkForNewConnections and checkForData.
import socket
class MySocketClass():
    def __init__(self, host_and_port):
        self.socketObject = socket.socket(socket.AF_INET, socket.SOCK_STREAM)
        self.socketObject.bind(host_and_port)
        self.socketObject.listen()
        self.socketObject.setblocking(False)

        self.queue = []
    def checkForNewConnection(self):
        try:
            conn, addr = self.socketObject.accept()
            self.queue.append(conn)
        except:
            pass

    def checkForData(self):
        data = ""
        for i in self.queue:
            try:
                data = i.recv(1024)
                if data:
                    print(data)
                else:
                    i.close()
                    self.queue.remove(i)
            except:
                pass
    def close(self):
        self.socketObject.close()

def main():
    socket_a = MySocketClass(("localhost", 1066))
    socket_b = MySocketClass(("localhost", 1067))

    sockets = [socket_a, socket_b]

    # Event loop
    while True:
        for i in sockets:
            i.checkForNewConnection()
            i.checkForData()

if __name__ == '__main__':
    main()
The end result works, but it is resource intensive. As can be seen in the screen-grab below, the code is consuming about 100% of a CPU’s time handling the event loop. I could probably significantly drop the CPU load if I put in time.sleep(...), but I’m not going to bother.

Next: I’m going to play with selectors, which is apparently what asyncio is built on.
26 Jan 2026
I’ve created a GitHub repo, which I’m calling sneak.A nice short name for a short project… hopefully.
To configure git and synch with Github, I ran the following:
$ mkdir sneak && cd sneak
$ git remote add origin git@github.com:AnnualChallenge/sneak.git
$ git remote -v
$ git pull origin main
My preferred Python editor is PyCharm CE. Using PyCharm, I’ve set up a new project in the sneak directory.
For the design, I’m going to use object oriented code. I’ve defined a class called SneakListener. The idea is that a SneakListener object will be instantiated per open port. It will hopefully make the code cleaner, as everything for dealing with connections will be contained within the class.
A first step, using the socket and threading libraries, is creating a simple class that allows for a server socket to be instantiated on a selected port. Per connection to that port, it will spin up with a thread, with a handler function within the class to deal with it. This will permit multiple connections from multiple sources to that one port, without blocking per connection.
import socket
import threading

HOST = "localhost"   # Listen locally only
PORT = 1066       # Listen on this port

class SneakListener():
    def __init__(self, HOST, PORT):
        self.HOST = HOST
        self.PORT = PORT

    # handler used for each thread.
    def handle_client(self, con, addr):
        print(f"[CONNECTION] {addr}")
        with con:
            # Loop whilst connection is retained.
            while True:
                # Exception handling to deal with termninated-early connections (e.g. nmap SYN scans).
                try:
                    data = con.recv(1024)
                    if not data:
                        break
                    message = data.decode()
                    print(f"[{addr}] {message}")
                    con.sendall(f"Echo: {message}".encode())
                except:
                    print("Connection terminated early - possibly nmap SYN Scan")

        print(f"[DISCONNECTED] {addr}")

    # Start method
    def start_sneak(self):
        with socket.socket(socket.AF_INET, socket.SOCK_STREAM) as server:
            server.bind((HOST, PORT))
            server.listen()
            print(f"[LISTENING] Server listening on {HOST}:{PORT}")

            # Thread call.
            while True:
                conn, addr = server.accept()
                thread = threading.Thread(
                    target=self.handle_client,
                    args=(conn, addr),
                    daemon=True
                )
                thread.start()

if __name__ == "__main__":
    mysneak = SneakListener(HOST, PORT)
    mysneak.start_sneak()
The main issue with the above code is that it blocks. The start_sneak function steps into a while loop and keeps going. So if I want to instantiate multiple SneakListeners, they won’t be called as the first one is blocking.
The next step is to explore various unblocking techniques, such as using Python asynchio or use the non-blocking functionality that comes with the socket library.
25 Jan 2026
First project - I thought I’d try something simple’ish first. I’m going to build a basic honey-pot with python. The primary objective is to detect suspicious behaviour in an environment; i.e. something is trying to connect to a port that shouldn’t be being used.
Here’s a set of initial requirements to work from.
- The system must be capable of monitor any TCP and UDP ports.
- The system must be able to detect TCP connection attempts (e.g. SYN packets)
- The system must be able to detect UDP packets being sent to any port.
- The system must be able to operate with concurrent connections.
- All connection attempts and ongoing connection engagements, must be logged to a log file specified either on the command line or through the a configuration file.
- If the log file already exists, events must be appended to the file (not overwriting the logs).
- Log entries must contain as a minimum:
- A timestamp.
- The protocol (TCP or UDP).
- Source and destination IPs
- Source and destination ports
- A truncated byte stream containing data send as a part of the connection or connection request (truncated to protect the log files from being saturated if large quantities of data is being sent).
22 Jan 2025
The challenge I have is that I’m using Obsidian (a note taking open-source application that uses markdown) to update the blog. This is stored in a separate folder to that of where my Jekyll site is hosted on my Mac. I want to still keep them separate, but at the same time, I don’t want to have to manually copy files across, to then commit and push the changes into GitHub.
I’m going to try using hard-links $ ln SOURCE DEST. This will hopefully allow Git to commit the changes to the content, rather than committing a the link destination if I was just using a symbolic link.
Before executing the following line, make sure the old index.md is backed-up / renamed first.
$ ln <directory_to_obsidian_files>/myblog.md <dictory_to_blog_content>index.md
I’ve run into another problem. Obsidian doesn’t add Front Matter. The local Jekyll server needs the Front Matter otherwise it breaks. Pages is also acting a little strange without it. However, manually adding the Front Matter using vi seems to stay put even after updating the document in Obsidian. Feels a little weak… but it is working for now.
20 Jan 2025
So I’ve created a git repo on my MAC; however, I’ve also got a running repo on GitHub where I was manually updating the files within GitHub. To avoid any issues I’ve decided to call the main branch master instead.
First step to getting access is to create an SSH key:
$ ssh-keygen -t ed25519 -C "<email_address_used_for_GitHub>"
It should prompt for a filename (or suggest using the default /Users/<mac_name>/.ssh/id_ed25519). Choose a different filename if needed and then provide it with a passphrase when requested.
Edit or add the following to the file: ~/.ssh/config.
Host github.com
  AddKeysToAgent yes
  UseKeychain yes
  IdentityFile ~/.ssh/id_ed25519
Run the ssh-agent in the background and add the new SSH key to the agent (including adding the pass phrase to the Apple Key Chain. Note that any previous GitHub SSH keys (if used before) will need to be removed from `~/.ssh/known_hosts, otherwise SSH will throw a wobbly.
$ eval "$(ssh-agent -s)"
$ ssh-add --apple-use-keychain ~/.ssh/id_ed25519
Finally, add the public key to the GitHub account using the following instructions
Pushing from the local git repo, to GitHub, add the following to make sure there is a connection to GitHub:
$ git remote add origin git@github.com:<repo_name>
$ git remote -v
Then push into GitHub (note that I’ve pushed to master rather than main. This needs to be changed in GitHub Pages to make sure the site is coming from the master branch now):
$ git push -u origin master
17 Jan 2025
I managed to fix the site. I stripped out everything from _config.yml, apart from:
title: A Year Of Code
Seemed to work! Not sure why though.
The next step is being able to more easily publish changes without having to manually update the site. Time to remind myself as to how ‘git’ works.
Getting my up to speed, I’ve gone W3Schools
Setting up git
$ git config --global user.name "<username>"
$ git config --global user.email <email>
$ git config --global core.editor vi
Initialise the repo and create the main branch and add all the site’s files.
$ git init
$ git add _config.yml _includes/ _layouts/ 404.html about.md index.md assets
Confirm that the necessary files / folders have been staged using:
$ git status
If any files / folders have been added by mistake, they can be removed from staging with the following command:
$ git restore --staged <file>
Finally, committing the staged changes and reviewing the commit log to make sure it worked.
$ git commit -m "First commit of the site."
Next steps:
- Get the changes into GitHub such that they are published into GitHub Pages.
- Do something to link my Obsidian markdown file (which is maintained in the Obsidian folder) into the git repository. I’m thinking on the lines of OSX hard links.
15 Jan 2025
To understand a bit more about Jekyll, I recommend starting with the step-by-step tutorial. For the purposes of my GitHub Pages blog, the things to be aware of are:
- The Jekyll build process takes the content within the Jekyll’s root directory and converts it to HTML (or copies it if there is no Front Matter) and places it into the _site folder.
- It keeps to the directory structure you define (unless explicitly configured otherwise).
- Within each folder, if you have an index.html, it treats it as the default page for the that directory.
- If you want the build to compile the files, they need to have ‘Front Matter’ at the beginning of the file. If not, it is just blindly copied across.
- To define a layout, you need a _layouts directory and then, within the ‘Front Matter’ you need to reference the layout file, you’ve added to the _layouts directory
An example of Front Matter for a Blog Post (sample that is included as a part of the install) is:
---
layout: post
title:  "Welcome to Jekyll!"
date:   2026-01-15 11:04:12 +0000
categories: jekyll update
---
Front Matter is simply YAML that can be references within the page using Liquid notation, and used to support the Jekyll build process.
To get the rough structure for this page, I’ve used ChatGPT - as it is pretty good at coming up with rough templates to work from. The direction given to ChaptGPT is that it has to be simple and clean and that it needs to use Bootstrap.
Create the default template - _layouts/default.html.
<!DOCTYPE html>
<html lang="en">
  <head>
    <meta charset="UTF-8">
    <title>{{ page.title }} · {{ site.title }}</title>
    <meta name="viewport" content="width=device-width, initial-scale=1">

    <!-- Bootstrap CSS -->
    <link href="https://cdn.jsdelivr.net/npm/bootstrap@5.3.2/dist/css/bootstrap.min.css"
      rel="stylesheet"
    >

    <!-- Custom styles -->
    <link rel="stylesheet" href="{{ '/assets/css/custom.css' | relative_url }}">
  </head>
  <body class="d-flex flex-column min-vh-100">

    {% include navbar.html %}

    <main class="container my-5 flex-fill">
      {{ content }}
    </main>

    {% include footer.html %}

    <!-- Bootstrap JS -->
    <script      src="https://cdn.jsdelivr.net/npm/bootstrap@5.3.2/dist/js/bootstrap.bundle.min.js">
    </script>
  </body>
</html>
Create the Nav Bar - _includes\navbar.html
<nav class="navbar navbar-expand-lg navbar-light bg-light border-bottom">
  <div class="container">
    <a class="navbar-brand" href="/">
      A Year Of Coding
    </a>

    <button
      class="navbar-toggler"
      type="button"
      data-bs-toggle="collapse"
      data-bs-target="#navbarNav"
      aria-controls="navbarNav"
      aria-expanded="false"
      aria-label="Toggle navigation">
      <span class="navbar-toggler-icon"></span>
    </button>

    <div class="collapse navbar-collapse" id="navbarNav">
      <ul class="navbar-nav ms-auto">
        <li class="nav-item">
          <a class="nav-link" href="/">Home</a>
        </li>
        <li class="nav-item">
          <a class="nav-link" href="/about">About</a>
        </li>
      </ul>
    </div>
  </div>
</nav>
Add the footer: _includes/footer.html
<footer class="bg-light border-top py-3 mt-auto">
  <div class="container text-center text-muted">
    <small>
      © {{ site.time | date: "%Y" }} {{ site.title }}
    </small>
  </div>
</footer>
Add the style sheets: assets/css/custom.css
body {
  font-family: system-ui, -apple-system, BlinkMacSystemFont, sans-serif;
}

main h1,
main h2,
main h3 {
  margin-top: 2rem;
}

main p {
  margin-bottom: 1.25rem;
}
Update index.md.
---
layout: default
title: Home
---

# Welcome

This is a **simple Jekyll site using Bootstrap**.

- Responsive layout
- Clean typography
- Minimal custom CSS

You can focus on content and let Bootstrap handle the structure.
Finally update _config.yml to add the site’s title.
title: My Bootstrap Jekyll Site
The output is fairly basic looking, but it is a start. Testing on GitHub Pages though isn’t going as well… It looks like of borked it! I’m going to have to spend some time working out how to get Jekyll content developed and tested locally into Pages.
10 Jan 2025
To ensure I can do some development and editing without having to wait for Github Pages to update, I’ve installed Jekyll locally. I’m using a Mac with Brew, to install all of the Jekyll dependencies, following these instructions: jekyllrb.com. This entry takes you through the steps I’ve taken to install Ruby and Jekyll and to get the test server running.
Installing Ruby on the MAC using Brew doesn’t override the default Ruby install already there. The Mac’s version of Ruby is too old. Therefore the $PATH variable needs to be updated so the Brew-installed Ruby takes precedence.
Installing Ruby and updating the $PATH variable:
$> brew install ruby
$> echo export PATH=\"$(brew --prefix ruby)/bin:\$PATH\" >> .bash_profile
Sorry, but I’m still using ‘bash’ on the Mac - not “zsh”, which is now Apple’s preferred shell.
Note that there are issues with Ruby >3.0.0 with Jekyll that requires the “webrick” bundle to be added. Also, versions of Ruby > 4.0.0.0, also don’t come with Logger installed. To get this working, the logger gem needs to be installed and “gem "logger"” needs to be added to the Gemfile.
$> gem install jekyll bundler logger
$> jekyll new myblog
$> cd myblog
$> echo "gem \"logger\"" >> Gemfile
$> bundle add webrick
$> bundle exec jekyll serve --livereload
There should now be a local HTTP server running on: http://localhost:4000
Next steps:
- Develop a template on localhost.
- Test the template on Github Pages.
- Add the most recent blog entries to GitHub pages, built on the new Jekyll template
1 Jan 2025
Happy New Year! May 2026 be a happy and prosperous year for all.
Now to start my Year of Code for real!
30 Dec 2025
GitHub Pages offers several themes that can be applied to the static site.
All that is needed is a config file _config.yml pointing to the theme to use.
As none of the themes ‘float my boat’, I’ve decided to structure the webpage myself, using the ‘Dinky’ theme as a starting template.
Full details of how to do this is: here
Using the Dinky ‘default.html’ template, I’ve made the following high-level changes:
- I’ve got rid of the footer
- I’ve linked out to a CDN offering the Bootstrap CSS and JavaScript libraries.
- I’ve used Bootstrap to experiment with restructuring the template. I’ll see if I can get some advertising onto the site at a later stage. Using Bootstrap should hopefully make it easier to do.
The main problem for now is the time between changing the files in the repo, and GitHub Pages updating the site. GitHub Pages is based on Jekyll, so the next step is to install it locally so I can experiment with the sites look and feel without waiting several minutes for the change to go live.
- Modifying the Dinky layout by including a ‘_layouts/default.html’ file
- Adding bootstrap Javascript and CSS links.
- Starting to structure the web page - menu on the left, content in the middle and future advertising to the right, etc.
29 Dec 2025
For my 2026 New Year’s resolution, I’ve decided to set myself technical challenges and document my progress for anyone to follow. I’m starting a bit early, just to get everything set up.
A bit about me: I’m a security architect and I spend most of my working day doing stuff that can’t really be considered as hands-on anymore. A typical working week consists of many meeting, lots of emails, writing documents, creating architecture diagrams, supporting business development, and (when I do have some spare time) trying to develop security-architecture strategy. As a result I’m really hankering for that technical, hands-on past.
So, for 2026, I’m planning to set myself and document technical challenges to solve real-life problems (problems for me at least).
My first challenge: setting up a single-page blog and repo to record my fun (and progress too).
To keep costs low - I’ve done the following:
- I’ve registered a cheap ‘dot com’ vanity domain for this project.
- I’ve set up a Github repo to store code, config and any documentation I may produce.
- I’ve configured Github pages to host this Blog, as it is free and uses Markdown (so I don’t need to spent time writing HTML / Javascript / CSS, or dealing with a CMS, like Wordpress).
The look and feel of Github pages is a bit shoddy. I think I’ll next spend a bit of time working on the styling of it; after which, I will look into methods to simplify the publishing process - ‘git’ would be the simplest approach, but for the ‘fun’ bit I thinking of coding something rudimentary in Python to do the publishing bit.